|
If something is worth doing, it’s worth doing right. |
 |
|
|
|||
|
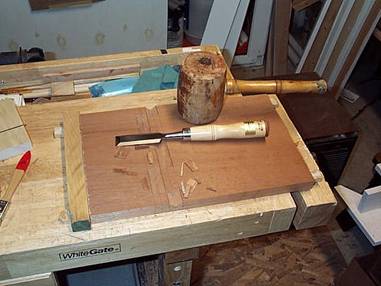
ProjectsHow To Make a One Board BookstandStep 1 Pick a board that has a bookstand in it so that all you have to do is trim away the unnecessary wood. It will probably look something like this when you first start trimming.
This is a nice piece of Spanish Cedar – typically used to line humidors and make premium cigar boxes because of the unique aroma and flavor it imparts to cigars stored in it. I had some left over, so decided to use it. It is closely related to Honduran Mahogany – it looks like, works like*, and has the strength of mahogany but is only 2/3 the weight, which makes it a favorite of racing shell (boat) builders – especially the cigar-smoking builders. Fortunately, I don’t have any allergic reaction to the wood as some people do. After carefully determining the center of the thickness of the board, the mortise locations are laid out and the mortise waste is chopped out. This isn’t a very good photo but the mortises go exactly halfway through the board. *Fairly easy on edge tools – except for the patches of silica, but because it’s an open pored, brittle wood, its prone to splitting and splintering. Not the best candidate for carving. Nice chisel, eh? It’s from a matched set of Ron Diefenbacher firmer chisels. He sells high quality products. I keep’em here. I said I have some left over Spanish Cedar.
Cut the board thickness in half along the previously identified ½ thickness lines, stopping when sawdust just starts to fall out through the hinge mortises. If you’re very good (or lucky), you’ll split the board exactly and not have to do any additional trimming (or so I’ve been told).
This takes a certain amount of luck, some skill, and a good
ripsaw. I have one of my Dad’s saws, sharpened by Tom Law. After exposing the hinges, trim the extra length of the front leg and bottom support with your crosscut backsaw. No, not that ripsaw, the crosscut one. You do have one, don’t you? I’d loan you one but I only have four. If I ever get a complete set with duplicates, I’ll think about loaning one out. Check back with me in 4 or 5 years.
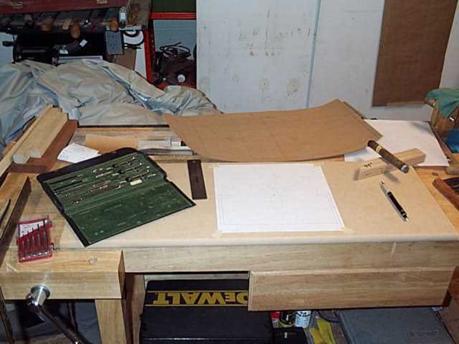
OK, now that the preliminary work is done, it’s time to start making it look good. Sketch out a couple or ten designs and pick the one that looks to be the easiest to cut and carve ;-)
The drawing doesn’t show up in this shot, but I’ve left it in because I wanted to show the drafting set I had when I was an Engineering student in college (a long, long time ago). With the design fixed to the wood with spray craft adhesive, it’s time to start carving. This will take some time…
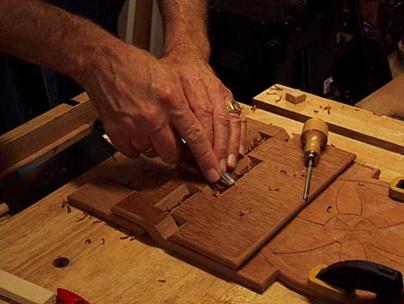
This picture is a little out of focus because the viewfinder on my camera all of a sudden quit working. I can still take pictures, but I’m not sure what I’m going to capture when I snap the shutter. Turns out that the design was more difficult to carve in this wood than I thought it would be. The splintery nature of the wood doesn’t agree with the acute angles in the design. One with less acute angles would have worked better. I’ll remember that on the next one;-) After the primary design is carved (a scant 20 hours of carving), it’s time to texture the secondary surfaces. I just remembered that the camera has a timer, so I get to be in the picture…well, my hands, anyway – dunno what happened to the flash except that it didn’t.
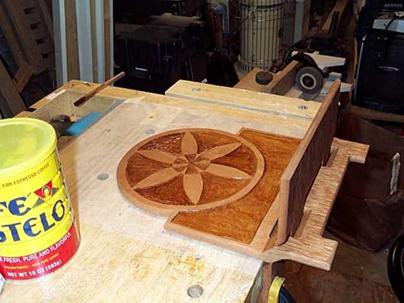
Finally, the cutting and carving are done. Now it’s time to start thinking about a finish. It’ll be shellac, naturally. I think I’ll glaze the background with dark shellac and put a clear finish over everything. I have some garnet (dark) shellac mixed, but I should make up a fresh batch of super blonde. Here’s what it takes: alcohol, shellac flakes, and a jar to mix them in (in which to mix them?).
Just about any alcohol will work, but the most commonly used is denatured alcohol, aka methanol (ethyl alcohol with methylated spirits added so you can’t drink it – at least not safely). You could use straight ethanol, but that seems like a waste of good booze. I like to add isopropanol to the mix because it evaporates more slowly than methanol and increases the drying time of the shellac. That means I won’t be as likely to get lap marks on larger surfaces. I dissolve the flakes in isopropanol and then add 10% - 20% more methanol. I’m not worried about lap marks on this small bookstand, but why change a habit if you don’t have to? The mixing is pretty much foolproof. Toss a handful of flakes in the jar and add alcohol (of your choice) to double the original depth of the flakes. Shake it up a few/several times a day for a few days and it’s ready. If you’re in a hurry, you can heat it – very carefully. Remember, that’s alcohol in the jar. Put it in a container of warm water to accelerate the process. (Rule of thumb is that for each 10o Celcius [18 o F] increase in temperature, the time required for any given chemical reaction is cut in half This results in about a 2 pound cut. Dissolved strengths are rated in pounds of dry flakes per gallon of alcohol, but you don’t have to mix up a whole gallon!! A 2# cut is good for most finishing tasks. A 1# cut is a good first coat/sealer coat. You can, of course, mix it all at a 1# rate, you’ll just have to apply more coats to build up a finish. Once dissolved, pure shellac is reputed to have a 6 – 9 month shelf life but I have some that is over 2 years old and still fresh. To test it, put a drop on a non-porous surface such as glass or metal and let it dry overnight. If it is hard enough to resist denting with your fingernail, it’s fresh. Most commercially available shellac (ugh, yuck!) is 3# or more – with other stuff (multisyllabic, unpronounceable chemical compounds) added to extend the shelf life, but if you’re the average weekend woodworker, you’ll wind up throwing out more than you use – a quart is a LOT of shellac. Shellac is a great natural product – easy to mix, easy to apply, really easy to repair (just wipe scratches, chips, & dings with some alcohol on a rag), and it’s foodsafe once fully cured (takes a week or so). Know what gives M&Ms and medicine pills that shiny coating? Yep, it’s shellac!! It is also a terrific sealer, and just about any other finish (latex and oil paints, varnish, polyurethane, lacquer, etc) will stick to it. Have a pine board with a knot that’s gonna seep through the paint? Seal it with shellac, then paint it. Already painted and seeping? Shellac it and repaint. That’ll fix it. Here’s what the mixed product looks like. Pickle jars, olive jars, salsa jars, any jar with straight (or mostly straight) sides works. This happens to be a Taco Bell Salsa jar. Notice the waxed paper under the lid? Shellac is also a very good adhesive. You can actually break the glass trying to open a jar if shellac has dried and stuck the lid to the lip. But the good news is that the spill will clean right up with alcohol. (DAMHIKT)
I pad on a “spit” coat to seal the wood and raise any loose fibers. I can then go back and trim them without pulling more loose. The pad is just a small piece of lint-free rag. I use an old plastic mustard squeeze bottle. Put some 2# in it, add an equal amount of alcohol, squeeze some out on the rag, and wipe it on the wood. Another nice thing about shellac is its very quick drying times. The spit coat of 1# cut mixed with methanol will dry in a matter of a few seconds. That means you can hold the workpiece on one side while sealing the other, then change the hold and continue to finish the entire thing. A lot of other finishes require that you do one side, wait overnight, then do the other side. Finish coats of 2# iso will dry in a matter of minutes to a couple hours, depending on temps & humidity. I’m seeing drying times of about 20 minutes for the finish coat of 2# iso in my ~60o garage. You can easily put 3 or 4 coats on in a single day. Try that with another finish! By now you’ve probably detected that I like shellac. Okay, after the spit coat, it’s time to glaze the background. I used one of my wife’s oil paint brushes (it’s okay, she gave me permission) to apply the garnet shellac and this is the result. I never dip my brush into the shellac jar – I pour off what I think I’ll need into another container. This is an old coffee can that I put a couple tablespoons of garnet into. After I finished glazing the bookstand, I rinsed the can with a little alcohol and poured that onto an old rag. Let the can dry, its ready for reuse. Let the rag dry and toss it into the trash. Remember, this stuff is non-toxic.
I’ll brush on a coat of super blonde and it’s ready to hold a book. Update: It’s now autumn, 2005. I made this bookstand in the fall of 2003 and gave it away as a Christmas present that year. I still haven’t gotten around to making another. |
||


|
|